Valentine’s Day desserts should be all about indulgence without the stress—that’s why I’m obsessed with these no-bake chocolate dessert cups! Picture this: last year, I burned three batches of heart-shaped cookies (oops) before realizing my oven was the real villain. That’s when I created these rich, creamy chocolate cups—ready in minutes with just a microwave and fridge. No fancy skills needed, just pure chocolate magic. They’re my go-to now when I want to impress my sweetheart (or treat myself!) without sweating over a hot stove. Trust me, the only thing better than how easy these are? The way they melt in your mouth.

Why You’ll Love These No-Bake Valentine’s Chocolate Dessert Cups
Listen, I know how chaotic Valentine’s Day can get—who has time for fussy desserts? That’s why these chocolate cups are my secret weapon. Here’s why they’re absolute perfection:
- No oven drama: Just melt, mix, and chill—no burnt edges or oven tantrums
- 15-minute magic: Faster than running to the store for overpriced chocolates
- Foolproof elegance: They look fancy but couldn’t be simpler (your secret’s safe with me)
- Customizable love: Top with raspberries for romance or extra whipped cream for pure indulgence
Seriously, the only thing sweeter than these cups? The look on your valentine’s face when they taste them.
Ingredients for No-Bake Valentine’s Chocolate Dessert Cups
Grab these simple ingredients—I promise you probably have most already! Quality matters here, especially with the chocolate. (Pro tip: Splurge on the good stuff—your taste buds will thank you.)
- 1 cup semi-sweet chocolate chips (or chopped baking chocolate—just make sure it’s high quality)
- 1/2 cup heavy cream, cold straight from the fridge (this makes all the difference for whipping)
- 1/4 cup powdered sugar (sift it if yours is lumpy—I learned that the hard way!)
- 1 tsp vanilla extract (the real stuff, not imitation—trust me on this)
- Fresh berries or extra whipped cream for topping (because everything’s better with berries!)
That’s it! Now let’s turn these into magic…
Equipment You’ll Need
You probably have everything already—this is the beauty of no-bake desserts! Here’s all you need to make these chocolate cups shine:
- Microwave-safe bowl (glass works best—no metal spoons!)
- Whisk or electric mixer (for that perfect whipped cream)
- Small dessert cups or silicone molds (I’ve even used espresso cups in a pinch!)
See? Told you it was easy. Now let’s get mixing!

How to Make No-Bake Valentine’s Chocolate Dessert Cups
Okay, let’s dive into the fun part—making these dreamy chocolate cups! Don’t worry, I’ve messed up enough times to know all the tricks now. Follow these steps, and you’ll have dessert magic in no time.
Step 1: Melt the Chocolate
First, grab that microwave-safe bowl and toss in your chocolate chips. Here’s my golden rule: 30-second bursts, stirring between each one. Why? Because chocolate is sneaky—it holds its shape even when mostly melted (learned that the hard way when I ended up with burnt chocolate sludge). Once it’s about 75% melted, just keep stirring off-heat until smooth. If you’ve got a few stubborn lumps, 10 more seconds max! Let it cool slightly while you whip the cream—hot chocolate + cold cream = grainy texture (and we don’t want that).
Step 2: Whip the Cream Mixture
Now, pour that cold heavy cream into a bowl (chill the bowl first if you’re fancy). Add powdered sugar and vanilla, then whip until you get stiff peaks—that means when you lift the whisk, the cream stands straight up like a little mountain. Pro tip: Under-whipped cream will make your cups too soft, over-whipped turns them grainy. Stop when it looks like fluffy clouds! Gently fold in the melted chocolate with a spatula—no vigorous stirring here. Think of it like folding a love letter into an envelope: slow, deliberate, and full of care.
Step 3: Combine and Set
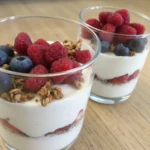
Spoon this heavenly mixture into your cups or molds—I like using a piping bag for fancy swirls, but a regular spoon works just fine. Now, the hardest part: waiting. Pop them in the fridge for at least 2 hours (I know, torture!). They’re ready when you gently press the top and it springs back slightly. Top with berries right before serving so they stay fresh and pretty. And voilà—you’ve just made the easiest, most impressive Valentine’s dessert ever!
Tips for Perfect No-Bake Valentine’s Chocolate Dessert Cups
After making these chocolate cups more times than I can count (okay fine, I have a problem), here are my foolproof secrets:
- Cold cream is key: Straight from the fridge whips up fluffier—warm cream turns into soup (ask me how I know).
- Chop chocolate evenly: Big chunks melt unevenly—tiny pieces mean smooth, lump-free bliss.
- Patience with folding: Rush this step and you’ll deflate all that airy goodness. Slow and steady wins the creamy race!
- Chill your bowls: I pop mine in the freezer for 10 minutes before whipping—makes peaks stiffer than my resolve not to eat all the batter.
Follow these, and your cups will be pure chocolate heaven!
Variations for No-Bake Valentine’s Chocolate Dessert Cups
Want to mix things up? These cups are like a blank canvas for your chocolatey dreams! Here are my favorite twists:
- Dark chocolate lovers: Swap semi-sweet for 70% dark—it’s richer and oh-so-romantic
- Crunchy surprise: Fold in chopped hazelnuts or toasted almonds for texture
- Mocha magic: Add 1 tsp instant espresso powder to the cream for coffee lovers
- Peanut butter swirl: Drop spoonfuls of warm PB into the cups before chilling
See? Endless ways to say “I love you” with chocolate! If you’re looking for more sweet inspiration, check out my collection of desserts.

Serving Suggestions
Oh, the fun part—making these chocolate cups shine! I love pairing them with fresh raspberries for a pop of color (and that tart contrast to the rich chocolate). For grown-up romance, serve with champagne flutes—the bubbles cut through the richness perfectly. Coffee lovers? A shot of espresso turns this into a fancy dessert cafe experience. And if you’re feeling extra, dust with edible gold flakes because Valentine’s Day deserves all the sparkle!
Storage & Reheating
These chocolate cups must stay refrigerated—they’ll keep happily for up to 3 days in an airtight container. No reheating needed (unless you count eating them straight from the fridge at midnight, which I totally endorse). Just don’t freeze them—the texture turns grainy and sad.
Nutritional Information
Just a heads up—nutrition varies based on brands and exact ingredients. But for reference, each glorious chocolate cup clocks in at roughly 250 calories with 18g fat (worth every bite if you ask me!). Not bad for pure chocolate bliss!
Frequently Asked Questions
Can I use milk chocolate instead of semi-sweet?
Absolutely! I’ve made these with milk chocolate when I wanted extra sweetness—just reduce the powdered sugar by half since milk chocolate is already sweeter. White chocolate works too, but add 1 tbsp extra cream to keep it smooth.
Why did my whipped cream turn grainy?
Ah, the heartbreak of over-whipping! Stop mixing as soon as peaks form—any longer and the fat separates. If it happens, gently fold in 1 tbsp fresh cream to rescue it. (Been there!)
Can I make these vegan?
Yes! Swap heavy cream for full-fat coconut cream (chill the can overnight first), and use dairy-free chocolate. The texture will be slightly denser but still dreamy.
How do I prevent the chocolate from seizing?
Water is chocolate’s nemesis! Make sure all bowls and utensils are completely dry. If it seizes, stir in 1 tsp warm vegetable oil to smooth it out.
Can I skip the refrigeration time?
I know waiting’s tough, but trust me—they need those 2 hours to set properly. Speed it up by using shallow molds (sets in 90 minutes) or the freezer (45 minutes max, then fridge).
Share Your Creation
Made these for your sweetheart? Snap a pic and tag me—I’d love to see your chocolatey masterpieces! You can also follow along for more ideas on Pinterest.
Print
Irresistible No-Bake Valentine’s Chocolate Dessert Cups in 15 Minutes
- Total Time: 2 hours 20 minutes
- Yield: 6 servings 1x
- Diet: Vegetarian
Description
A simple and delightful no-bake chocolate dessert perfect for Valentine’s Day. These chocolate cups are easy to make and require no oven.
Ingredients
- 1 cup semi-sweet chocolate chips
- 1/2 cup heavy cream
- 1/4 cup powdered sugar
- 1 tsp vanilla extract
- Fresh berries or whipped cream for topping
Instructions
- Melt the chocolate chips in a microwave-safe bowl in 30-second intervals, stirring each time until smooth.
- In a separate bowl, whip the heavy cream, powdered sugar, and vanilla extract until stiff peaks form.
- Gently fold the melted chocolate into the whipped cream mixture until fully combined.
- Spoon the mixture into small dessert cups or molds.
- Refrigerate for at least 2 hours or until set.
- Top with fresh berries or whipped cream before serving.
Notes
- Use high-quality chocolate for the best flavor.
- You can substitute dark or milk chocolate based on preference.
- Store leftovers in the refrigerator for up to 3 days.
- Prep Time: 15 minutes
- Cook Time: 5 minutes
- Category: Dessert
- Method: No-Bake
- Cuisine: American
Nutrition
- Serving Size: 1 cup
- Calories: 250
- Sugar: 20g
- Sodium: 10mg
- Fat: 18g
- Saturated Fat: 10g
- Unsaturated Fat: 6g
- Trans Fat: 0g
- Carbohydrates: 25g
- Fiber: 2g
- Protein: 3g
- Cholesterol: 30mg
Keywords: no-bake, chocolate dessert, Valentine's Day, easy recipe